All You Need to Know About the Montessori Grammar Boxes
The Montessori Grammar Boxes are an unparalleled equipment for primary school language studies.
Like all Montessori materials, they allow children to experience the concept, soaking up each part of speech through fun and games. Read on to find out what exactly they are, how they work and how you can make them at home!
|
What are the Montessori Grammar Boxes? How Do the Grammar Boxes Work? How are the Grammar Boxes designed? Presenting the Montessori Grammar Boxes |
What are Montessori Grammar Boxes?

Montessori grammar boxes are sets of colour-coded cards that each showcase one particular part of speech. The child demonstrates the phrase or sentence they’re working on and so experiences the function of each part of speech and the structure of the language.
How Do the Grammar Boxes Work?
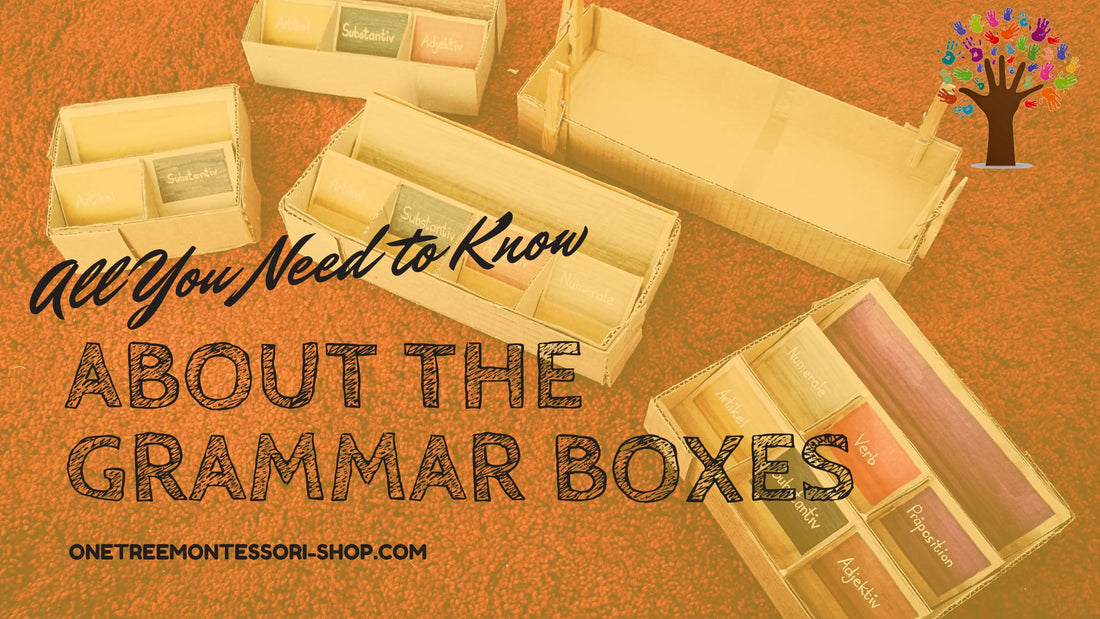
Each part of speech has a number of sets that will consist of colour-coded cards. These are arranged in the corresponding box (which has colour-coded compartments).
The child uses the word cards to build phrases and experiences them by acting them out or finding the object. Usually, only the part of speech in focus will change from one phrase to the next.

This empowers the child to experience the function of the words, without having to first study tedious definitions of what a noun and such is.
There are verbal exercises for small groups and children who cannot yet read, and permutations (changing the order of the words) for children who have worked with the boxes a lot.
The grammar boxes work because they engage the child, let them move around and experience things. They build up a hidden understanding of grammar and language structure, which later can be formalised and operationalised.
And instead of the child having to study grammar, learning definitions and picking up sentences for no apparent reason, the grammar boxes turn the “study” of grammar into a series of lightbulb moments, enlightening what the child already knows and letting them experience the importance of each part of speech.
How Are the Grammar Boxes Designed?
Each part of speech has a specific symbol (see below). The colours used here are the ones from the Advanced Montessori Method, Vol. 2.

Some manufacturers use alternative colours. Some people say this is to avoid rote learning through reliance on the colour scheme. Personally, I have not found any written evidence to back this up - if you have, please let me know in the comments!
The symbols and colours allow for quick and easy sorting and classifying. For example, children can find the word card they need by looking through a certain colour set, rather than reading all the different cards.
They also simplify later grammar analysis (see presentations below). By placing the symbols over the words, the child can quickly recognise and reproduce patterns. For example, by always seeing the medium brown triangle before the big black triangle, they subconsciously learn that adjectives (in English) come before the noun.
The symbols can also be used to encourage creative writing by being placed in a sequence, from which the child then has to make a sentence.

In upper elementary (9-12 years), the symbols are further divided for a deeper analysis of the different parts of speech:

Presenting the Montessori Grammar Boxes
There are a number of Montessori grammar box presentations.
1 - Commands
For non-readers or reluctant readers and anyone who wants to join. Best done in small groups.
- Invite a few children. Theatrically read the commands on the command cards and let the children carry them out.
- You can easily make commands up yourself. The only trick is to isolate the part of speech you’re busy with. The Advanced Montessori Method, Vol. 2 has loads of examples.
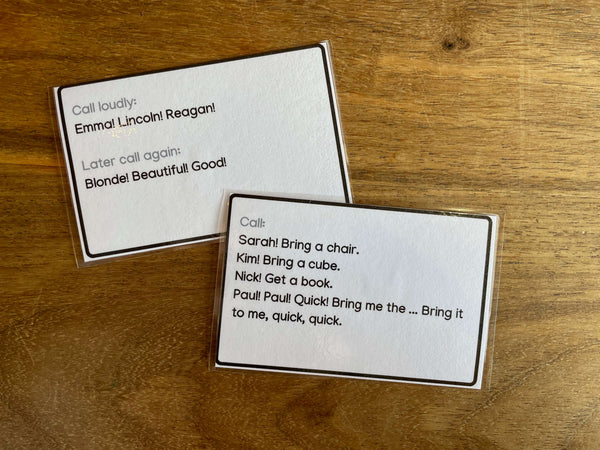
Examples:
- Noun: Luke, bring me a cube! Petra, bring me a chair! Phillip, bring me the … bring me … but bring it to me, quick!
- Adjective: Gather four objects. Show me the largest. Show me the smallest.
- Preposition: Bring me a vase. Bring me flowers. Place the flowers in the vase. Now place the flowers on the vase. Place the vase on the flowers!
2 - Work with the Grammar Boxes
2.1 - Verbal Introduction (Example: Adjective)
- On a strip of paper, write “the pencil”. A child will fetch a pencil, and you dramatically refuse each one, saying, “Not that pencil. The pencil!” until the child asks, “Which one is it!?”
- Write down a colour, say “blue”. Cut apart the previous strip and place “blue” between “the” and “pencil” so you have “the blue pencil”. The child will fetch it.
- Now ask a sequence of questions to place the grammar symbols:
- Which word tells you what to get? - pencil (noun)
- Which word tells you whether it’s a specific or any pencil? - the (article)
- Which word tells you what kind of pencil? - blue (adjective)

Example questions for
- Verb: “Open the door.” - Which word tells you what to do?
- Preposition: “the flowers in the vase” - Which word tells you the relationship between the nouns? Or, which word tells you where to put the objects?
- Adverb: “Close the window gently.” - Which word tells you how to close the window?
- Pronoun: “The bowl is on the table. It is fragile.” - Which word refers to the bowl?
- Conjunction: “Bring the chair and the mat.” - Which word connects (or coordinates, contrasts) the chair, the mat?
- Interjection: “Oh! The tea is too hot!” - Which word would you exclaim
2.2 - Grammar Box Activities
- Get out the filler box (phrase and/or word cards) and the relevant grammar box (box with containers).
- Show the child how to sort the filler cards into the compartments (by colour).
Version 1
- Read all phrases on the big card (example: the red pencil, the green pencil, the blue pencil) and find the objects or carry out the actions.
- Then, build the first phrase (the red pencil) with the little cards and place the grammar symbols above them (use the guiding questions if necessary, although the matching colour should be control of error enough).
- Place the red pencil beside the built phrase.
- To build the next phrase, only swap out the word that changes (green). Remove the red pencil and replace it with the green pencil.
- Repeat for any following phrases.
Version 2
- Read the first phrase, build it with the cards and act it out.
- Read the second phrase, change the cards accordingly and act it out. (To formalise the learning - recommended only after the child can complete these independently - ask questions like, “Is this the same? What’s the difference? Does it make sense?”)
- Then, place the grammar symbols.
3-Period Lesson
Read this blog post if you need more information.
- Phase 1: Naming (repeat for each word until all symbols are placed)
- Ask: “Which word tells you what you need to get (the name of the object)?” - e.g. pencil
- Place the symbol (big black triangle).
- Say: “The word that names things is called noun.”
- Phase 2: Recognition (repeat for each word until all symbols are placed)
- Ask: “ Which word is a noun (article, adjective, etc.)?”
- Place the symbol (or let the child do it).
- Phase 3: Recall (repeat for each word until all symbols are placed)
- Make sure the labels in the compartments are covered.
- Point to a word and ask, “Which part of speech is this?”
- Let the child place the symbol.
Copying & Extending

If the child can write comfortably, encourage them to copy the phrases into their work book and trace the symbols above each word.
If they’ve got some experience with the grammar boxes, encourage them to come up with their own phrases, prepare cards for them and add them to the box.
Analysis & Creative Writing
Pick excerpts from books the child is reading or from their own writing and place the grammar symbols over each word. This can be done by copying the paragraph/sentence by hand or typing it out in double-spaced lines. Use the questions from the 3-Period Lesson above.
Create a pattern or sequence with a few grammar symbols and encourage the child to build a sentence following the pattern. This is particularly fun for poetry!

Permutations

Highlight the function of the word: Once the phrase has been built, remove the focus word. Ask the child, “Does this still make sense? Does it give us all the information we need?”
Example : [...] [the] [left] [arm]

Highlight the exactness of meaning: Once one phrase has been built, insert the focus words from the other phrases. Ask the child, “Does this still make sense?”
Example: [bend] [straighten] [the] [left] [arm]

Highlight the order of words in a sentence: Change the words around, moving the focus word to the beginning or end, swapping the nouns and so forth. Each time, ask the child. “Does this still make sense? Does it mean the same as before?”
Example: [the] [bend] [left] [arm]

Example: [the] [left] [arm] [bend]

How to Make Your Own Montessori Grammar Boxes
To buy the ready-made grammar box cards, the wooden grammar boxes, filler boxes and command boxes will easily cost you a few hundred US-Dollars.
If you have some time to spare, you can simply make the materials yourself, though.
Filler Cards
Get your hands on a copy of the Advanced Montessori Method, Vol. 2 (you can find it for free on archive.org), prepare to spend hours in front of a computer and use a simple table in Microsoft Word (or Canva) to type out the cards.
Grammar Boxes
Check our Subscriber Freebie with supporting materials for the grammar boxes! You can simply print and laminate these flat-lays, although I would recommend dividing the spaces with hot glue so the cards don’t move around.
If you’re looking for something more sturdy, get your instructions for a cardboard DIY version of the grammar boxes. I made mine (German version) in 2016 for the elementary classroom and they’re still holding up great!

Now you know all there is to know. Go forth and share the joy of grammar with your students and children!
2 comments
Brilliant. Much helpful Thanks.
I stumbled upon your website and am over the moon to see grammar boxes made from cardboard. As a Montessori-trained elementary guide, and now homeschooling, I’m thrilled to see resourcefulness in creating this expensive for purchase material!