Teaching Time Zones Hands-On for Ages 6-9
Time zones can be confusing for adults. But for children, they're a fascinating part of geography. And with the right approach, kids can start exploring time differences in the first grade already.
Find out how below.
Contents
|
Interested in specific time zone knowledge you can use during your teaching? Head on over to our sister post: What are World Time Zones?
Teaching Time Zones
Time itself is an abstract concept. Although different places on Earth naturally have different times of day, the idea of standardised time zones is a human invention.
When teaching time zones to children, it's important to start as concretely as possible. We don't want them to blindly calculate time differences. Instead, they need a solid understanding of how the whole system works.
This is easier than it might sound: there are hands-on activities that prepare for working with time zones. This preliminary work is actually a lot of fun and also helps the children learn about the Earth in general.
In fact, we compiled a sequence of lessons you need to teach time zones to kids, refined them in our Montessori elementary classroom and now have the bundle in our store!

When Should I Introduce Time Zones?
Although many schools only cover time zones in fifth grade and above, our Time Zone Bundle easily introduces time zones during the first year of school - whether at home or in your classroom!
Because we explore key concepts with concrete lessons, children don't have to suffer through meaningless time calculations. That, to be fair, is better suited for 12-year-olds than first graders - if it has to be endured at all.
Rather, the hands-on discovery makes learning about time zones in grade one easy, simple and fun.
Montessori Time Zone Lessons
We outlined the sequence of lessons like they would be done in a Montessori classroom. Step 1 and 2 teach the children about Earth's relation to the sun and the effects of its rotation. This fosters a deep understanding of the principles standard time zones are based on and makes actually working with time differences (Step 3) much easier.
For each section or step, there is a video that shows exactly how to do the relevant presentations.
While the lessons can be done following on from each other (like in a self-contained study unit), they naturally fit into the First Great Lesson - the Story of the Universe. Because this story is retold every year, the whole time zone sequence can be covered in the first year, and/or revisited in greater depth in the following years.
You can read more about the Great Lessons over at Montessori Kiwi.
The activities in Step 1-3 are provided in our comprehensive Time Zone Bundle.
Step 1: Sun & Earth
Video for all presentations in Step 1
This first section offers a quick dive into the solar system. It's nested right within the First Great Lesson - there are many lessons about the Sun and the Earth, but only the following applies directly to our study of the time zones:
1.a - Only Some Sunlight Reaches Earth
Important previous experiences: First Great Lesson & follow up work

Using a torch and a small bead, we demonstrate how little sunlight actually reaches Earth. This builds an impression of Earth’s relation to the Sun and invites children to explore the characteristics of sunlight (for example, that it doesn't always hit Earth at a straight angle).
An impressionistic chart further helps the children to imagine our planet in space.
Key concept: sunlight reaches Earth
Step 2: Earth's Rotation
Video for all presentations in Step 2
Time differences are caused by Earth's rotation. This section explores the effects of Earth's rotation and introduces cardinal directions.
2.a - How Lucky that Earth Rotates
Important previous experiences: First Great Lesson; Only Some Sunlight Reaches Earth

We start a discussion about the effects of heat and what would happen if Earth didn’t rotate. Depending on the children’s experiences, we might talk about campfires, barbecues or even sunburn.
To consolidate this impression, we show a chart that illustrates what would happen if the Earth didn't rotate.
Key concept: every part of Earth gets sunlight
2.b - Introducing Cardinal Directions
Important previous experiences: How Lucky that Earth Rotates
We use the daily sunrise and sunset to introduce two cardinal directions: East and West. This is a short, verbal presentation with some interesting etymology.
Did you know, for example, that the word east comes from the Greek goddess “Eos”, deity of dawn? Likewise, the word west comes from the Latin “vesper”, which means evening.
Key concept: there are directions, and they have names
2.c - Cardinal Directions & the Compass
Important previous experiences: Introducing Cardinal Directions

Here, we use a compass to find all four cardinal directions (North, East, South, West) in the room. We discuss how Europeans oriented themselves using the stars and introduce the North Star and the Big Dipper as well as the Southern Cross.
The labels and cards stay on the walls while we play directional games over the next days. From this point on, we often use the cardinal directions to help children locate items in the classroom. We also explicitly include them in other related geography lessons so the vocabulary stays meaningful.
Key concepts: the four cardinal directions are North, West, East, South; people use objects in the sky to navigate and plan
2.d - Day & Night: Appearance & Reality
Important previous experiences: Cardinal Directions & the Compass; awareness of clocks

First, objects in the classroom are used to show that even though something looks like it's moving, that's not necessarily the case.
Then, we extend this discovery and explore why it looks like the sun is traveling across the sky when we know for a fact the Earth is the one moving. Lastly, we identify the Earth as rotating eastward.
The chart pictured here is not actually used in this lesson.
Key concepts: the Earth rotates eastward; Earth's rotation makes it look like the sun is moving even though it isn't
2.e - Day & Night: Parts of the Day
Important previous experiences: Day & Night: Appearance & Reality; awareness of clocks; awareness of daily routines

Using a third impressionistic chart, the parts of the day are formally introduced. Revisiting the Earth’s rotation, we look at how different places experience the day passing at different times.
We define a day as lasting 24 hours and draw a connection to the clock, introducing the concept of hours.
Key concepts: parts of the day vocabulary; a day lasts 24 hours; different parts of the world have different times of day
Step 3: Time Zones
Video for all presentations in Step 3
After all of that preparatory work, we're ready to formally introduce time zones. This section starts by exploring latitude and longitude, which form the basis for time zones. All lessons are still done hands-on, although they are now noticeably more complex.
3.a - Introducing Latitude & Longitude
Important previous experiences: all of Earth's Rotation; awareness of navigation/maps/wayfinding; angles

As a more complex presentation, this lesson invites the participation of the children while we learn about latitude, longitude and related vocabulary.
Through discussion, we explore how people may have found their way navigating the oceans and introduce the Western method of measuring latitude and longitude. Using the ruler, torch and globe, we demonstrate how those imaginary lines would look drawn across the world.
To formalise these impressions, we use the styrofoam balls to mark lines of latitude and longitude.
Key concepts: latitude and longitude; related vocabulary
3.b - Latitude and Longitude Cards
Important previous experiences: Introducing Latitude & Longitude

These 5-part cards (also available as a stand-alone product) introduce and formalise vocabulary for latitude and longitude, including the equator, hemispheres and meridians.
After laying out the control cards, the children match the pictures and labels. Children who can read already can leave out the controls and match the texts, instead. The control booklet enables them to check for mistakes independently.
You can find a detailed explanation of the vocabulary cards and their myriad of uses here.
Key concepts: relevant vocabulary; reading practice
3.c - Introducing Time Zones
Important previous concepts: Latitude & Longitude; awareness of clocks

Combining what we have learned so far, we review what we know about the world and time before introducing the Chart of Time Zones. The children should have a few days of exploring before moving on to the next activity.
Key concepts: relevant vocabulary; there are standard time zones; east is ahead of west
3.d - Time Zone Cards
Important previous experiences: Introducing Time Zones

These 5-part cards introduce and formalise vocabulary for time zones, including daylight saving time, universal time, time zone and the international date line.
After laying out the control cards, the children match the pictures and labels. Children who can read already can leave out the controls and match the texts, instead. The control booklet enables them to check for mistakes independently.
You can find a detailed explanation of the vocabulary cards and their myriad of uses here.
Key concepts: relevant vocabulary; reading practice
3.e - Time Zones: Clock Match
Important previous experiences: Introducing Time Zones; Time Zone Cards

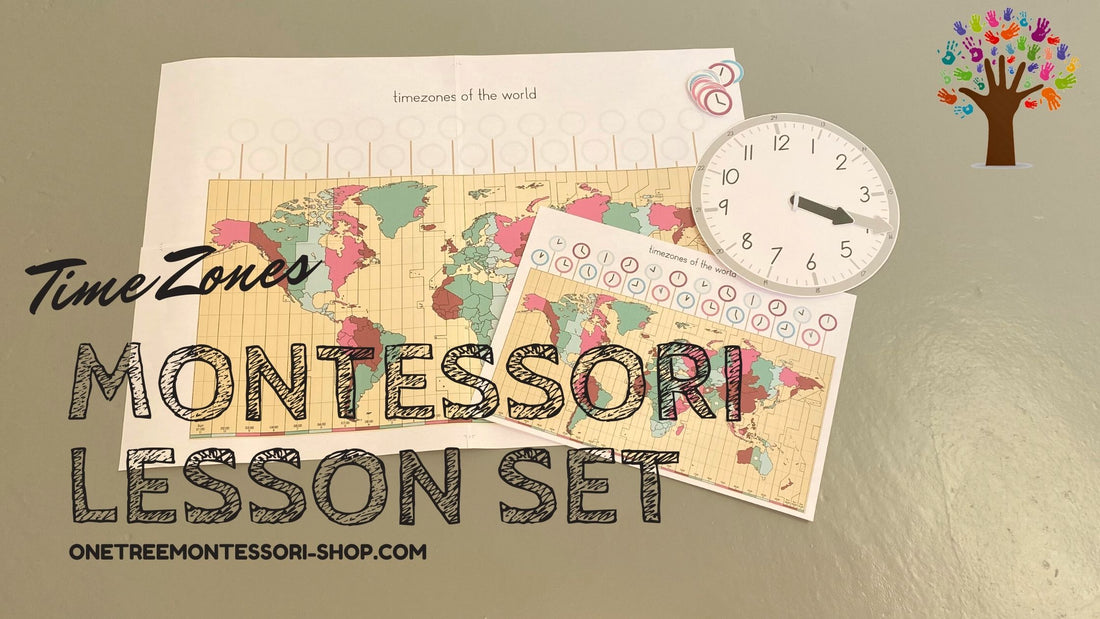
After a lot of exploration of previous concepts, we introduce the work with the time zone chart.
Clocks are matched to their time zones, with UTC being 12:00 as a reference point. The colour-coding and a smaller control chart provide the child with an independent control of error. This activity can be repeated many times.
Differentiation
The matching can be adapted to the children's confidence level. Easiest is to pick a clock, find it on the smaller control chart and then place it on the large chart.
Another option would be to lay out the little clocks and look for the one most left on the control chart to place it on the large chart. Then, the clocks can be arranged in order from left to right.
To add a challenge, we place the control chart and/or the clocks a distance away from the large chart. This way, the children have to work their memory while they walk up and down to match or arrange the clocks.
When the children are very comfortable with this work, they can arrange the clocks independently and only consult the control at the end.
Extensions
An extension we like is to print a smaller version of the empty chart and coloured clocks so the children can cut and paste the clocks.
Additionally, the children can discover places on the map, draw connections to previous explorations of the world and find personal relevance by identifying time zones where friends or relatives live.
The black and white clocks are used to determine the time in different zones, too – but they reference the user's time zone. So, for example if they're in Sydney and it’s 16:00, they'd place the 4-o’clock clock above Sydney and then arrange the rest of the clocks accordingly.
This activity is a little harder because there is no inherent control of error. We normally introduce it after the children are very comfortable arranging the coloured clocks.
By providing verbal challenges, the children can explore various versions of this work and really get comfortable with the way time changes across the globe.
Extra tip: With sheer black ribbon, we can even show which time zones currently have nighttime.
Key concepts: time zones differ by one hour each; hours are added going east; hours are subtracted going west
3.f - Time Zone Problem Cards
Important previous experiences: Time Zone Clock Matching; reading a clock; basic arithmetic

This final lesson presents a culmination of a variety of skills. Using calculation aids, charts and a manipulative clock to calculate time differences, this activity may be broken down into individual lessons if the child is not ready to follow all the steps.
There is a lot of material, and it may be overwhelming for some. Likewise, we can easily forgo the aids if the child is secure enough with the work.
The basic steps are as follows:
- Lay everything out neatly
- Pick a problem card and read it
- Make the time on the manipulative clock
- Find and mark the first location on the Time Zone Chart 2
- Zero the calculation strip on that time zone
- Mark the second location on the Time Zone Chart 2
- Count how many hours you have to add/subtract
- Place the correct calculation arrow on the clock
- Adjust the time
- Find the right picture and label
- Check with the book
So at first, it might be enough to make the time and find the locations on the time zone chart.
The child might feel very secure in counting the time zone differences, then they do not need the calculation strip. Or, if they have a lot of experience reading clocks, they may not need the calculation arrows.
Over time, they will be able to just look for the correct picture and label.
This activity is great because it can be made simpler, be extended, or broken into individual steps. Locations can be added on the map and the children can make their own problems.
As an extension (or simplification, depending on the child), we use the first Time Zone Chart and the black clocks to figure out the time differences. After reading the problem, we locate the places on either time zone chart by marking them with a playing figure or pebble. Then, we arrange the black clocks, starting with the original location's time.
We can also work with a 12-hour time instead of the 24-hour format the problem cards have or use online time converters to check how the time differences change during daylight saving time.
Key concepts: calculating time differences
Time Zone Fun Facts
There should be 24 time zones of one hour difference each. But some countries have 30-minute or 45-minute differences. Today, there are 37 time zones in use.
The word “clock” comes from Latin clocca, meaning “bell”. This is because the first mechanical clocks announced the hour with bell rings.
Universal Time (UT) is solar time, measured by how long it takes the sun to reappear in the zenith (solar noon). It is normally measured using the stars (sidereal time) and then converted to UT.
Modern GPS satellites use the IRM (IERS Reference Meridian), which moves a little according to Earth’s rotation, and is a bit away from the original Greenwich meridian.
The Trans-Siberian railway (Moscow to Vladivostok) crosses 10 time zones on its 6-day journey.
Some countries have half-hour or quarter-hour time differences, for example, India, Myanmar, Iran or certain parts of Australia.
India and China have a single time zone even though they span multiple. In China, many areas actually have a local time that is different from the standard time.
There are 25 military time zones, labelled with letters of the NATO alphabet (except J for Juliet).
Even though the North and South Pole technically have all time zones, they observe UTC all over.
Only 26 of the sovereign states of the world attended the International Meridian Conference in 1884.
Between 10:00 and 11:59 UTC every day, three different dates are in use in the world.
Daylight Saving Time Fun Facts
Bangladesh tried DST for six months in 2009 to avoid blackouts. While electricity was saved, people were not happy at all.
Only three countries in the world observe “winter time” – the opposite of DST. Namibia was one of them (wanting to save children from walking to school in the dark) but stopped in 2017 so business with South Africa would be easier. During Namibian winter time, the Zambezi region did not change their clocks, so Namibia had two local times.
The Anjajavy resort in Madagascar made its own time zone to have a prettier sunset.
A 2007 law in the US extended DST past Halloween to give trick-or-treaters more light and more traffic safety.
Many AM radio stations are licensed to operate only in daylight because at night, the signal travels further and can cause more interference with other stations. For them, DST means losing a whole profitable hour in the morning.
Amtrak trains in the US cannot leave their station before the scheduled time. So, during the fall time change, they have to wait an hour, but during the spring change, they are immediately an hour behind their schedule.
![]()
Extra Resources
Videos
Time Zone Lessons - Step 1: https://youtu.be/CUvZLsg-NA4
Time Zone Lessons - Step 2: https://youtu.be/fbMdp1jlgUg
Time Zone Lessons - Step 3: https://youtu.be/JxIwroBcmQo
These are the world’s strangest time zones: https://youtu.be/J1kOkoma_hM
Downloads
National Geographic Time Zone Project
One Tree Montessori Time Zone Bundle
Websites & Reading
A somewhat balanced history of Universal Time
The Global Transformation of Time: 1870-1952 (book for teachers)
Interactive time zone map: https://www.timeanddate.com/time/map/ (for kids)
Time converter: https://www.worldtimebuddy.com/ (fun for kids)
As you can see, explaining time zones to kids doesn't have to be boring or difficult. With these hands-on lessons, time zones are fun, relevant - and fit right in with your geography curriculum!
We encourage you to try them out at home or in your classroom. If you have questions or would like to share your experience, comment below or tag us (One Tree Montessori) in your social media posts.